1/20/2022

CAS Mix Up January 2022 Challenge - Sending Hugs

Hi everyone,

When I saw the CAS Mix Up Challenge theme on New Year's Day, I thought this was an encouragement for me to try something this year I'm always shying away from.

Jenny's prompt this month is:


I tend to create crisp, geometric cards with lots of die-cut elements, and "Loose Watercoloring" seems to be on the opposite end of my craft spectrum. 

I sometimes think I'm too uptight to do loose watercoloring(!) ðŸ˜“

Anyway, I gratefully took Jenny's challenge. It's a new year and it's a good time to push your boundaries a little, right?

This is as loose as I could watercolor!


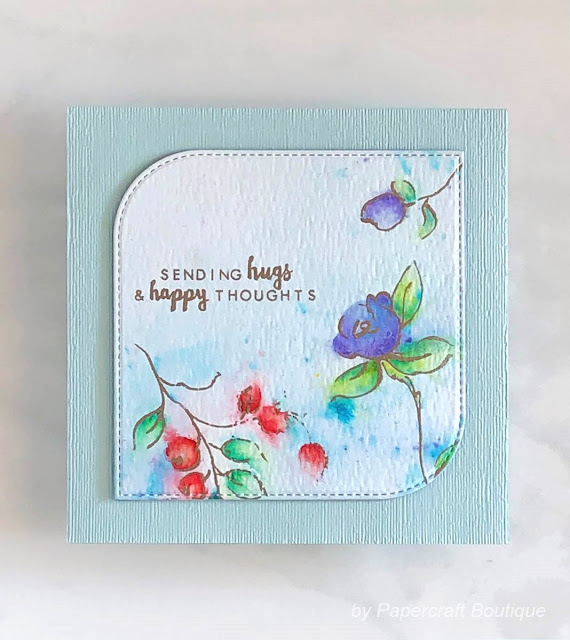
[How I made the card}

1. Heat-embossed the image and the sentiment on a piece of watercolor paper.

2. Wet the paper with my flat brush.

3. Sprinkled a very small amount of Brusho over the flowers, berries, and leaves, and moved the paint with a small brush. 

4. Sprinkled some blue Brusho on the background and moved the paint with a medium brush.

5. Die-cut the watercolored panel, and popped it up on the dry embossed card base. 


The card is a little less CAS than I usually do, but I feel I accomplished my mission with the help of Brusho's free-moving powder. 😉

Thanks for visiting me today!


Stamp: Golden Garden, Beautiful Day (Altenew)
Paper: Distress Watercolor Cardstock (Ranger), Soft Sky (Stampin' Up!)
Ink: VersaMark (Tsukineko)
Others: Brusho (Violet, Leaf Green, Ost. Red, Sea Green, Cobalt Blue), Embossing Powder (Liquid Platinum - Ranger), Dies (Stitched Mod Square STAX - My Favorite Things), Embossing Folder (Subtle Dynamic - Stampin' Up!), Foam Tape (3M)

1/17/2022

CAS Christmas January 2022 Challenge - Happy Holidays

Hi everyone,

This is the mid-month reminder for the Silver and Gold challenge with Julia as host at CAS Christmas.


I made a masculine Silver & Gold card this time:


[How I made the card]

1. Sponged around the stag stencil with Silver pigment ink, going very lightly toward the edges of the panel.

2. Sprinkled silver glitter embossing powder over the ink and heat-embossed it.

3. Aligned the negative stencil to mask outside of the stag, and laid a knit sweater pattern stencil over it.


4. Stenciled the knit sweater pattern with gold pigment ink.

5. Die-cut the front panel and layered it on the silver glitter matte.

6. Foiled the sentiment, die-cut it, and layered it on another die-cut sentiment to add dimension.

7. Adhered the sentiment to the front panel.

8. Glued the entire front panel to the card base.


Please check out the challenge blog for more inspirations, and join us! The link is open until midnight (PST) on January 24th.


Paper: Basic White (Stampin' Up!), Glitter Paper (Silver - Recollections)
Ink: Encore Ultimate Metallic Ink (Silver, Gold - Tsukineko)
Others: Stencil (Christmas Reindeer - ArtPlorations, Winter Stencil Strip - My Favorite Things), Dies (Wonky Stitched Rectangles STAX - My Favorite Things) Glimmer Hot Foil (Gold - Spellbinders), Glimmer Plate (Yana's Christmas Sentiments - Spellbinders), Connect Glue (Gina K)

1/03/2022

CAS Christmas January 2022 Challenge - Merry Christmas

Happy New Year, everyone!

I hope you're enjoying your new year. My DH and I are doing nothing but sleep, eat, take a nap, watch Netflix, and repeat. 😉

We're starting this year at CAS Christmas with Silver❇ and Gold❇ as the theme. Our talented Designer, Julia (Create with Me) is hosting the challenge this month. We have a wonderful Guest Designer, Lisa (My Paper Tales). Welcome, Lisa! 


And just a reminder of the rules:


I tried to create a variety in Silver and Gold, using different textures and patterns.


[How I made the card]

1. Die-cut the trees from silver and gold textured foil cardstock, patterned vellum, and white cardstock.

2. Foiled the sentiment in gold on the front panel.

3. Glued the die-cut trees on the panel.

4. Adhered a die-cut tiny heart to the white tree.

5. Raised the entire front panel with foam tape and adhered it to the card base.


I love this fir tree die-set. You can use an outline die cutout and an inside tree shape separately (the silver trees in the picture) or combined.

Check out the challenge blog to see the inspiring cards from our Designers and the Guest Designer. It's a great month to start building your Christmas card stash! Looking forward to seeing your card in the gallery!


Paper: Basic White, Winter Wonderland Designer Vellum Stack (Stampin' Up!), Textured Foil (Silver and Gold - gift from a sweet friend)
Others: Dies (Fir Trees with Frame - Alexandra Renke, Hip Clips - My Favorite Things), Glimmer Hot Foil (Gold - Spellbinders), Glimmer Plate (Holiday Sentiments - Spellbinders), Foam Tape (3M), Connect Glue (Gina K)