9/25/2020

happy 75th birthday, nancy!

Hi everyone,

Today we're celebrating a special day for my dear friend, Nancy Littrell, and I'm joining her birthday linky party Loll is hosting. Thank you so much, Loll, for organizing this fun party to celebrate Nancy's birthday!

I made this card earlier this month, and I hope she received it in time.


[How I made the card]
1. Sprayed Distress Oxide Spray (Lucky Clover and Salty Ocean) on a piece of vellum.
2. Dry embossed the sprayed vellum.
3. Gold heat-embossed the sentiment on the vellum.
4. Die-cut the window frame and adhered the vellum from behind with double-sided tape.
5. Glued some sequins on the vellum.
6. Popped up the window frame on the card base with foam tape.


Nancy, I hope you are having a wonderful day, and celebrating with your sister Margie. Have many many more happy years! Love and hugs.. 😊💕


Stamp: Bitty Birthday Wishes (My Favorite Things)
Paper: Translucent Vellum (My Favorite Things). Whisper White, Pool Party (Stampin' Up!)
Ink: Distress Oxide Spray (Lucky Clover, Salty Ocean - Ranger), VersaMark (Tsukineko)
Accessories: Embossing Folder (Beaded Garland - Sizzix), Dies (Double Pierced Rectangle Die - Avery Elle), 
Embossing Powder (Gold - Hero Arts), Sequins (Sparkling Clear Mix - Pretty Pink Posh, Satin Gold - Altenew), Double-sided Tape, Foam Tape (3M), Connect Glue (Gina K)

9/20/2020

CAS Mix Up September Challenge - thanks, friend

Hi everyone,

Joanna, CAS Mix Up Designer, is challenging us with Embossing with Dies this month. It's always fun to stretch your supplies, isn't it?


Here's my card:


Embossing with Dies, Stamping, Die-cutting

[How I made the card]
1. Made impressions of the flowers using dies and embossing mat.
2. The impressions looked very subtle, so I colored the flowers with light blue ink (Tumbled Glass) by masking the flowers with die-cut negatives.
3. Die cut flowers and colored with Distress Oxide Inks, and placed them over the embossed flowers. I stacked the gray die-cut flowers three times to add some dimension.
4. Die-cut the thin frame and glued it on the card base.
5. Stamped the sentiment.


I liked the subtle dimensional interest created by the embossed marks and the stacked die-cuts.


Thank you for visiting me today!


Stamp: Bitty Thanks & Gratitude (My Favorite Things)
PaperWhisper White, Sahara Sand (Stampin' Up!)
Ink: Distress Oxide Ink (Tumbled Glass, Shabby Shatters, Weathered Wood), Distress Ink (Weathered Wood)
Accessories: Dies (Flower - Gift from a friend, Essential Rectangles - Ellen Hutson), Connect Glue (Gina K)

9/15/2020

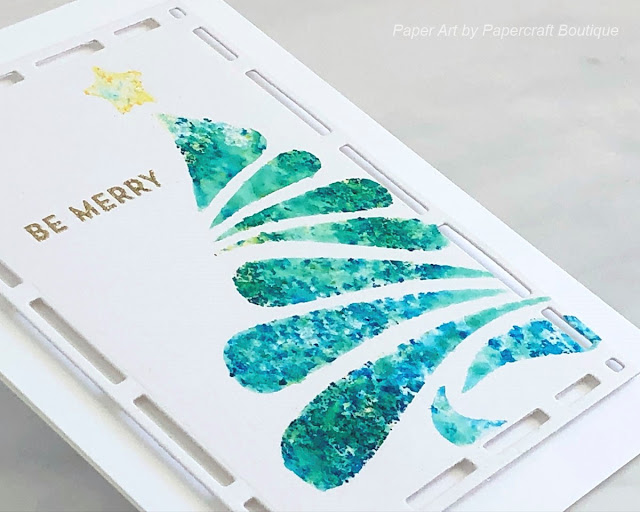
CAS Christmas September Challenge - be merry

Hi everyone,

We're already half way through September. I'm here with a reminder card for the CAS Christmas September Challenge. The challenge of this month is ...


And here's my Christmas tree card:


[How I made the card]
1. Sprayed Pixi (light-tack adhesive) on the back of the tree stencil, and placed it on a piece of mixed media paper.
2. Sprinkled Brusho over the stencil, and spritzed water.
3. Blotted excess water with paper towel and removed the stencil.
4. Die-cut the stenciled paper with a frame die and heat-embossed the sentiment.
5. Adhered the front panel on to the card base.


I hope you'll check out the challenge blog to see the wonderful cards from our Designers, Guest Designer, and the participants. The challenge closes on September 24th. Looking forward to seeing your card in the gallery!


Stamp: Snow Globe Sentiments (My Favorite Things)
Paper: Mixed Media Paper (Strathmore - 140 lb.), Whisper White (Stampin' Up!)
Ink: Brusho (Yellow, Sea Green, Turquoise), VersaMark (Tsukineko)
Accessories: Stencil (Christmas Trees - ARTplorations), Dies (Simple Stackers - Penny Black
), Embossing Glitter (Metallic Gold Sparkle - Wow!) Foam Tape (3M)

9/03/2020

CAS Christmas September Challenge - merry christmas

Hello everyone,

It's only 3 months till December. Have you started preparing Christmas cards?

Colleen is hosting this month's challenge, and she chose Christmas Tree as the theme. I'm sure you have one or two Christmas tree stamps and/or dies. I hope you check out our challenge site and get some inspiration from the cards our Design Team and our Guest Designer, Steph (My Paper Corner), made.


Here's my card. I used the foiling technique for this card.


[How I made this card]
1. Inked the stamp with the Foil Transfer Gel using a piece of sponge and stamped on the white card base.
2. Placed an emerald watercolor foil sheet (*1) over top and ran it through my laminator.
3. Gold heat-embossed the star-like snowflake at the top of the tree and the sentiment below the tree. 
4. Die-cut the image, using a frame die. Die-cut the same frame three times from red card stock (*2) and glued the frames together. 
5. Dry-embossed the card base to give it some texture and glued the front panel onto it.


(*1) I love the watercolor foil sheet. It has different colors on one sheet as you can see in the close-up below.

(*2) I wanted to add a little bit of red somewhere, so I decide to stack the frames together under the tree panel so that the color peeks out.


See you in the gallery! You have until September 24th.


Stamp: Snow Swirled (Stampin' Up!), Snow Globe Sentiments (My Favorite Things)
Paper
Whisper White, Real Red (Stampin' Up!)
Ink: VersaMark (Tsukineko)
Accessories: Deco Foil Transfer Gel, Deco Foil (Emerald Watercolor), Embossing Powder (Hero Arts), Dies (Elegant Rectangle STAX - My Favorite Things), Embossing Folder (Bricked - Tim Holtz), Connect Glue (Gina K)