11/12/2023

Cherish the Moment

Hi everyone,

I was inspired by the beautiful cards created by the Group of Seven Cardmakers, and tried my hand at the Stenciling over Heat Embossing technique.

Here's what I made:


I heat-embossed the background using a Balloon String background stamp with Clear Sparkle embossing powder, and then stenciled over it with a City Scene stencil and three blue distress oxide inks.

A lucky accident happened during the process. The Clear Sparkle embossigng powder has glitter, so when I stenciled over it, most of the glitter on the cityscape image came off. This unintentional effect worked well for the image I had in mind - a rainiy cityscape!

I hope you can see the sparkly rain in the sky in this picture:


I created a frame impression using a rectangular die and an embossing pad, and then I attached a foild sentiment strip to the front panel. 

I usually visit Tokyo in spring and fall, but I didn't make the trip this fall, which left me feeling a bit nostalgic.😢 Maybe that's why I picked up this cityscape stencill for this techniqe. 

Thanks for visiting me today!


Stamp: Balloon Strings (My Favorit Things)
Ink: Distress Oxide Ink (Tumbled Glass, Salty Ocean, Blueprint Sketch - Ranger), VersaMark (Tsukineko)
Paper: Basic White, Basic Black (Stampin' Up!)
Others: Stencil (Sity Scene - Altenew), Embossing Powder (Clear Sparkle - Wow!), Glimmer Hot Foil Plate (Glitter Wishes - Spellbinders), Glimmer Foil (Prism - Spellbinders), Connect Glue (Gina K), Dies (Nested Frame Rectangle - Hero Arts), Embossing Pads (Spellbinders)

10/15/2023

Violet Flowers

Hi everyone,

The Group of Seven Cardmakers recently shared a new technique, Dry Embossing with Re-inker Watercoloring. Since I didn't have suitable black pigment ink for the technique, I used white pigment ink instead. You can find detailed technique instructions for this technique on the Group of Seven website.

Here's what I've made:


I was aware that using white pigment might result in a grainy look on the watercolored surface, so I decided to take advantage of the effect and used "Masonry Wall" embossing folder for the background.

I felt the wall panel needed a bit more definition, so I added a very thin violet foil matte (although you can hardly see it) to the back of the panel and raised the entire panel with foam tape. The violet flowers were die-cut from a piece of white cardstock with a double-sided adhesive sheet attached to it. 

I'm excited to see how this technique will stretch the use of my embossing folders.

Thanks for visiting me today!😊


Ink: Distress Ink Reinker (Milled Lavender, Stormy Sky, Bundled Sage - Ranger), Pigment Ink (Unicorn White - Hero Arts)
Paper: Cold Press Watercolor Paper (Arches), Naturals White (Stampin' Up!), Metallic Confections (Lavender Foil - Tim Holtz)
Others: Embossing Folder (Mansory wall - Altenew), Dies (Violet Flower - Alexandra Renke), Double-sided Adhesive Sheets (Altenew), Connect Glue (Gina K), Foam Tape (3M)

9/23/2023

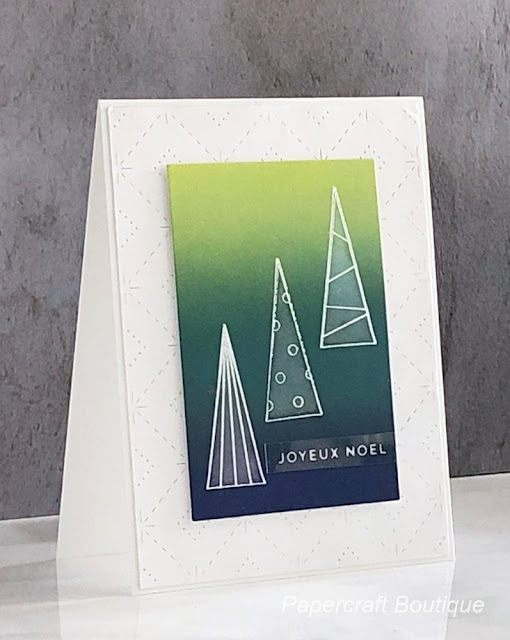
Joyeux Noel

Hi everyone,

I was inspired by the wonderful cards on the Group of Seven Cardmakers blog to create a card using the ink-blending-with-water-lifting technique.


I blended 3 Distress Oxide Inks (Twisted Citron, Rustic Wilderness, Chipped Sapphire) and let it dry overnight, following the helpful tips from the GO7 cardmakers. I heat-embossed the image, and ink-lifted the trees. The sentiment was hot foiled on a piece of acetate, and glued onto the front panel. To add a bit of texture to the background, I debossed the diamonds pattern on the white panel.

And just like that, another Christmas card is done! 😊

Thanks for visiting me today! 


Stamp: Clean Line Christmas (Simon Says Stamp)
Ink: Distress Oxide (Twisted Citron, Rustic Wilderness, Chipped Sapphire - Ranger), VersaMark (Tsukineko)
Paper: Basic White (Stampin' Up!), Mixed Media Paper (White 140 lb. Strathmore)
Others: Embossing Powder (Detail White - Gina K), Glimmer Hot Foil Plate (Mini Christmas Sentitment Strips - Spellbinders), Glimmer Hot Foil (White - Spellbinders), Clear Acetate Sheets (Simon Says Stamp), Dies (Stitched Diamonds Coverplate - Pinkfresh Studio, Nested Frame Cuts Rectangle - Hero Arts), Connect Glue (Gina K)

8/23/2023

Paper Hugs

Hi everyone,

The Group of Seven Cardmakers recently shared the Coloring Dry Embossing technique, and I finally got a chance to give it a try!


Applying white pigment ink to the embossed surface was very easy and the card itself was simple to create. I didn't want to cover the beauty of the embossed image, so I chose a short sentiment and foiled it on a piece of acetate.

Thanks for visiting me today! 😊


Ink: Pigment Ink (Unicorn White - Hero Arts)
Paper: Not Quite Navy (Stampin' Up!)
Others: 3D Embossing Folder (Rose Bouquet - Altenew), Glimmer Hot Plate & Die (Glimmer Kit of the Month 2021- Spellbinders), Glimmer Hot Foil (White - Spellbinders), Clear Acetate Sheets (Simon Says Stamp), Basic Pearls (Stampin' Up!), Detail Blending Brushes (Altenew), Connect Glue (Gina K)

7/16/2023

Merry Christmas

Hi everyone,

The Group of Seven Cardmakers shared beautiful off-the-edge cards with us this time.

I love the off-the-edge design element, so I tried something new for my card today. I saw this post and video by Jennifer McGuire some time ago, and tried out the technique.


When you open the card, Santa is there again.


I couldn't resist opening and closing the card over and over, and I hope the person receiving it will have just as much fun.

I realized that there were less than 5 months left before sending out Christmas cards.😓 I definitely need to start making a few every week, especially since I'll be out of town for a while this fall.

Thanks for visiting me today! 😊


Stamp: Cozy Christmas (Ellen Hutson)
Ink: Encore Ultimate Metallic (Silver - Tsukineko), Distress Oxcide (Tumbled Glass, Stormy Sky - Ranger)
Paper: Basic White, Real Red, Basic Black (Stampin' Up!)
Others: Dies (Santa Clause with Gift Bag - Alexandra Renke), Gel Pen (Gelly Ball White - Sakura)

5/11/2023

You Inspire Me

Hi everyone,

I tried out a new technique using alcohol inks last weekend on a gelli plate that was shared by The Group of Seven Cardmakers. I followed their instructions and made this card.


This is a 5 x 7 card, using a 3" circle gelli plate. I blended three colors of Alchohol Ink on my gelli plate, die-cut the leaf branch, and heat-embossed the sentiment.

I have another card that turned into a little wintery one.


I used one of my favorite stencils, Bubbles, on the gelli print background. By using white pigment ink to stenicil and then clear heat-embossing the pattern, I was able to create opaque bubbles on the gelli print and white ones outside of the circle. I also lightly ink-blended the background to highlight the white pattern. Doesn't it look like falling snow or rain streaming down the window? 

It was a fun experiment and I'm looking forward to trying out the other shapes (square and triangle) of mini gelli plates in the set.

Thanks for visiting me today! 😊


[Card 1]
Stamp: Craftt Friends (Altenew)
Ink: Alcohol Ink (Purple Twilight, Indigo, Stream - Ranger), VersaMark (Tsukineko)
Paper: Basic White (Stampin' Up), Metallic Confection (Copper - Tim Holtz)
Others: Mini Gelli Plate (3" circle - Gel Press), Dies (Curved Leaf Branches - Alexandra Renke), Embossing Powder (Copper - Ranger), Isopropyl Alcohol 91%,  Connect Glue (Gina K)

[Card 2]
Ink: Alcohol Ink (Purple Twilight, Cobalt, Clover - Ranger), VersaMark (Tsukineko), Pigment Ink (Unicorn White - Hero Arts), Distress Oxcide Ink (Wilted Violet, Blueprint Sketch - Ranger)
Paper: Basic White (Stampin' Up)
Others: Mini Gelli Plate (3" circle - Gel Press), Dies (Corneflowers, Glasses - Alexandra Renke, Handwritten - Little B, Nested Frame Rectangle - Hero Arts), Stencil (Bubbles - Alexandra Renke), Embossing Powder (Clear - Hero Arts), Isopropyl Alcohol 91%,  Connect Glue (Gina K)

4/25/2023

Hope Your Day Is Wonderful

Hi everyone,

When I saw the theme of The Flower Challenge this month, I immediately remembered that I had an old stamp, perfect for the job - Focus on Background Stamping.

Here's my card:


I haven't used the rose background stamp in a while, so I was excited to have a chance to ink it up again. I clear heat-embossed the background image, sprinkled several colors of brusho powder over the background, and spritzed water to naturally mix the colors. 


The sentiment foil plate is new to me, so I'm linking the card to the NBUS Challenge #49.


Thanks for visiting me today! 😊


Stamp: Roses All Over (My Favorite Things)
Ink: VersaMark (Tsukineko)
Paper: Watercolor Paper (Arches - Cold Press 140 lb.), Basic White (Stampin' Up!)
Others: Hot Foil Plate and cordinate die (Wonderful Sentiments - Pinkfresh Studio), Glimmer Hot Foil Sheet (Espresso Bean - Spellbinders), Embossing Powder (Clear - Hero Arts), Brusho (Ost. Red, Yellow, Orange, Sea Green, Cobalt Blue, Violet), Dies (Rouded Rectangle - Hero Arts, Folk Edge Circle - Pinkfresh Studio), Connect Glue (Gina K)

4/19/2023

Can't Wait to See You

Hi everyone,

The Group of Seven Cardmakers shared another new technique called Dry Embossed Gilding Flakes. I was excited to try it out, so I ordered a jar of gilding flakes which I received yesterday.

Here's what I made:

First, I made a gilding flakes background, following the instructions and tips of the Go7 cardmakers and friends. A plastic food container and a piece of Swiffer dry cloth were very helpful to contain and clean up the flakes. I used Altenew's double-sided adhesive sheets for the first time, and I have to say I love them. The thick release paper made it very easy to handle the sheet.

I also loved that the gilding flakes I used had beautiful teal flakes in them.

I then die-cut the bird from the background, and dry embossed it with the white front panel so that the embossed lines of the bird and the background are seamless. I swiped teal Archival Ink over the bird's embossed surface to bring out the teal of the flakes. The ink didn't color much, but it was still okay. I didn't have any issues with the ink's drying speed. The sentiment was hot foiled.


I'm happy with the final result, and I think the gorgeous shine and colors of Gilding Flakes are worth cleaning up the mess! 😉

I'm sharing my card at The Group of Seven Cardmakers.


I'm also linking the card to the NBUS Challenge #49 because my embossing folder and gilding flakes are new to me.


Thanks for visiting me today! 😊


Ink: Archival Ink (Paradise Teal - Ranger)
Paper: Basic White (Stampin' Up!)
Others: Gilding Flakes (Autumn Leaves - Creative Expressions Cosmic Shimmer), Embossing Folder (Masonry Wall - Altenew), Dies (Bird Shapes - Ellen Hutson), Glimmer Hot Plate (Glitter Wishes - Spellbinders), Hot Foil Sheet (Rose Gold - Spellbinders), Connect Glue (Gina K)

3/26/2023

Get Well Soon

Hi everyone,

The Group of Seven Cardmakers shared another fun technique called 'Debossed Inky Resist', so I tried the technique earlier this month.


I followed the instructions and tutorial videos on the Go7 website. I debossed a piece of watercolor paper with a rose embossing folder, white heat-embossed it, and then smooshed it with yellow, orange, and blue inks. 

The sentiment is DIY, using my new laser printer, toner reactive foil, and a laminator.


I'm glad to know that I can use my embossing folders this way. 

Thanks for visiting me today! 😊


Paper: Watercolor paper (Canson XL 140 lb.), Basic White (Stampin' Up!), Vellum (My Favorite Things)
Ink: Distress Ink (Spiced Marmalede, Mustard Seed, Salty Ocean - Ranger), Distress Oxide Ink (Spiced Marmalede, Mustard Seed, Salty Ocean - Ranger), VersaMark (Tsukineko)
Others: Embossing Folder (Manhattan Flower - Stampin' Up!), Embossing Powder (White - Hero Arts), Dies (Single Stitch Line Rectangle Frames - My Favorite Things), Oval Punch (Stampin' Up!), Deco Foil (iCraft - Copper), Connect Glue (Gina K), Laser Printer (Brother), Laminator (3M)

3/20/2023

Happy Birthday

Hi everyone,

I want to share with you a card I made for my high school classmate who shares the same birthday as me in the spring. We've been exchaging birthday wishes for many years now, and it's always a joy to celebrate the special day together even though we live across the ocean.

This is a card I made for her this year, featuring cherry blossoms. We both love them.


I stamped a cherry blossom branch and colored the blossoms using a stencil. For added dimension, I partically die-cut the branch from the top panel, glued a thin pink strip at the bottom of the panel, and raised it with foam tape. I dry embossed the card base, and foiled the sentiment on vellum to give it a touch of elegance. I hope my friend likes the card as much as I enjoyed making it.


I'm linking my card to The Flower Challenge #78.


Thanks for visiting me today!😊


Stamp: Dotted Blooms (Altenew)
Paper: Basic White, Melon Mambo (Stampin' Up!), Vellum (My Favorite Things)
Ink: Distress Oxide Ink (Spum Sugar, Picked Raspberry, Twisted Citron - Ranger), Encore Ultimate Metallic Ink (Champagne - Tsukineko)
Others: Dies (Dotted Blooms - Altenew), Stencil (Dotted Blooms - Altenew), 3D Embossing Folder (Angled Mosaic - Altenew), Hot Foil Plate (Mini Everyday Sentiments - Spellbinders), Hot Foil Sheet (Copper - Spellbinders), Modern Label Punch (Stampin' Up!), Foam Tape (3M), Connect Glue (Gina K)

2/17/2023

Happiness Blooms From Within

Hi everyone,

I got a beautiful new floral stamp set. The set has 6 different flowers, and coloring each of them was a little daunting to me, so I cheated...


I think this paper pack will save me coloring time for a while. 😁

I heat-embossed 5 flowers in white using the masking technique, and gold heat-embossed the sentiment in the center. I raised the front panel with a piece of chip board. It was quick and easy!

I'm entering the card in these challenges:


Thanks for visiting me today! 😊


Stamp: Six Flowers (Alexandra Renke), Colorful Life (Poppy Stamps)
Paper: Basic White (Stampin'Up!), Ink Drops (Candy - Craft Consortium)
Ink: VersaMark (Tsukineko)
Others: Embossing Powder (Fine Detail White - Gina K, Gold - Hero Arts), Dies (Infinity Dies Rectangle - Hero Arts), Connect Glue (Gina K)

2/06/2023

Love

Hi everyone,

Have you checked the first technique post for Group of Seven Cardmakers?

After being inspired by all those gorgeous cards in the post, I tried a creative heat-embossed background technique this weekend.

Can you guess what tool I used to add VersaMark to the red cardstock?


The answer is ... a toothbrush. It made an interesting pattern.

I lightly dipped a toothbrush in a spoonful of VersaMark and swiped it on the cardstock. Then I sprinkled Chunky White, and heat-embossed it. The sentiment was die-cut three times and stacked together for dimension.

It was easy up to this point, but then I was stuck in deciding the color(s) of the frame and the card base. I was so into making a background that I didn't think of the whole card. I tried different colors and color combinations to match the red panel - white on white, white on red, brown on brown, white on brown, brown on light blue, white on light pink, silver on white... I didn't like any of the color combos.😞

I literally slept on it, and I finally thought of a clear (non-color) card base. I really liked it because it made the background the star of the show. 

I really enjoyed making the random pattern background, and I think this technique would definitely expand the background choices for your cards. Kudos to the Group of Seven Cardmakers! 

Thanks for visiting me today! 😊


Paper: Basic White, Real Red (Stampin' Up!)
Ink: VersaMark (Tsukineko)
Others: Embossing Powder (Chunky White - Stampendous), Dies (Love Brush - Alexandra Renke, Mod Rectangles STAX - My Favorite Things), Acetate Sheet (Grafix), Connect Glue (Gina K)

1/26/2023

You Inspire Me

Hi everyone,

Do you enjoy problem-solving?

I do, especially when I make cards. So I'd like to share with you my problem-solving process this year as well as my regular cards.

Here's my card for today:


I made the card using an old (retired) set of stamps which I didn't know how to use for a long time. The set has several butterflies with different patterns. 


I love the floral pattern butterflies in the set, and I've used them many times, but I've never used the realistic ones (at the bottom of the picture). My coloring doesn't seem to be good enough to match the realistic look.

When I saw Laura's card on Pinterest, it was a lightbulb moment. I was happy to find a solution to my problem with the stamps, ie. stamping with a very light color! It's so simple but I never thought of it.

I used light gray ink to stamp, and lightly colored the butterflies in pinks with a blender pen. The wood plank background and the sentiment were stamped with Champagne Metallic ink.

I made a circle rocking card with the circle panel, but the difficult thing was to balance the weight so that the sentiment is level to the ground when the card stops rocking. The two butterflies on the right side are heavier than the one on the left. To balance the weight of the card, I glued a little piece of thick paper to the back of the left side of the white circle. 


The butterflies still have a soft realistic look, and the coloring was so easy. It was also fun to give new life to old stamps by using them with newer supplies.

Thanks for visiting me today! 😊


Stamp: Papillon Potpourri, Perfect Words (Stampin' Up!), Wood Planks (Simon Says Stamp)
Paper: Basic White (Stampin' Up), Pale Rose (Bazzill)
Ink: Smoky Slate, Strawberry Slush, Blushing Bride, Crisp Cantalope (Stampin' Up), Encore Ultimeate Metallic Ink (Champagne - Tsukineko)
Others: Dies (Circle Framelits - Stampin' Up!, Folk Edge Circle - Pinkfresh Studio), Punches (Elegant Butterfly, Bitty Butterfly - Stampin' Up!), Blender Pen (Stampin' Up!), Connect Glue (Gina K), Foam Tape (3M)

1/05/2023

Happy New Year!

Happy New Year, everyone!

I hope you had wonderful holidays.
The weather was not good in LA for the last several days, so it was perfect for not feeling guilty about staying home and being lazy, ie. eat, watch movies & TV, sleep long hours, and repeat. 😁 I had time for making a new year card too.


I used a turnabout stamp to make an original pattern paper for the circles. The sentiment was gold heat-embossed on vellum, and the card base was dry embossed for textural interest. This is the Year of the Rabbit, so I made an origami rabbit to accomapny the card.

Thanks for visiting me today! 😊


Stamp: Let It Snow Turnabout Stamp Set (Concord & 9th), Happy New Year Wishes (Mama Elephant)
Paper: Basic White, Soft Sky (Stampin' Up!), Vellum (My Favorite Things)
Ink: Soft Sky (Stampin' Up), Grapesicle (My Favorite Things), Encore Ultimate Metallic (Gold, Silver - Tsukineko), VersaMark (Tsukineko) 
Others: Dies (Hemstitch Squares - Spellbinders, Circle Thin Framelits - Simon Says Stamp), Embossing Powder (Gold - Hero Arts), 3D Embossign Folder (Angled Mosaic - Altenew), Wink of Luna (Metallic Gold - Kuretake), Connect Glue (Gina K)